Saturday, December 15, 2018

Timesheet

Timesheet workflow allows employee to submit their periodic time report to their manager for approval.

Form

The form include a time table for the employee to fill in their records. The employee then selects their manager for approval. Before submitting, the employee needs to sign the timesheet to certify. 

Workflow

The workflow was configured with Unique Document Check to ensure that there is only one timesheet per period submitted. 
Each route in the flow makes used of placeholders to make the name of the action more user-friendly. 


Roles

  1. Document Owner: the employee submitting the timesheet
  2. Manager: the supervisor to approve the timesheet
  3. Human Resources: the HR department who review and finalize the timesheet
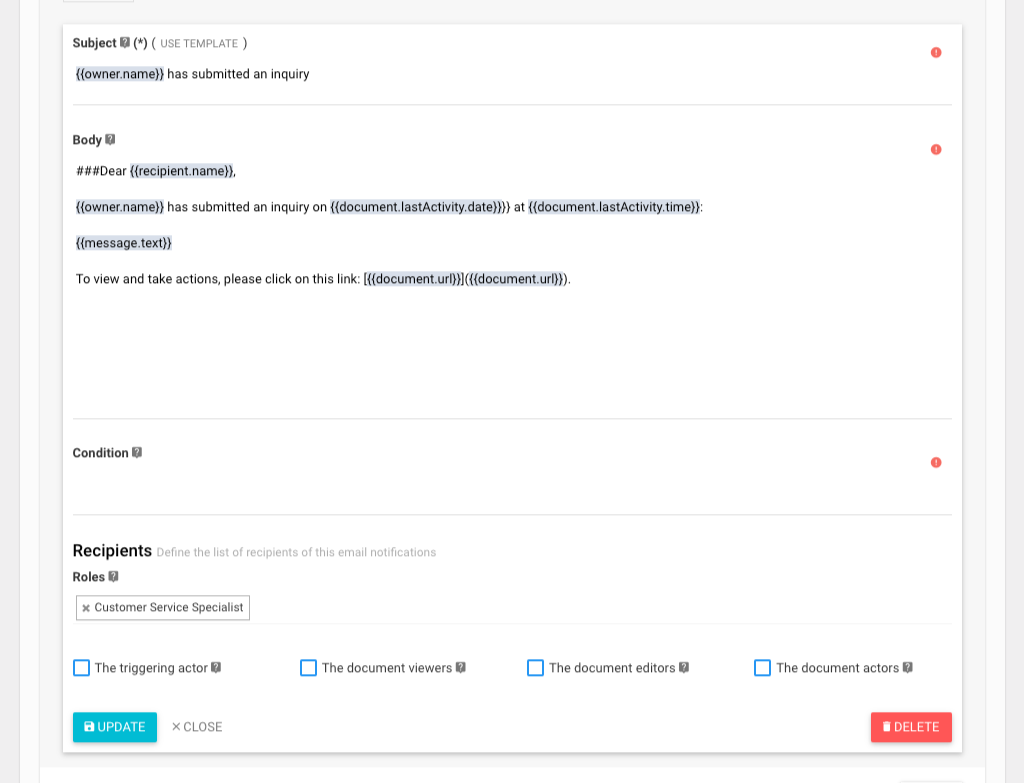
Triggers

There are many triggers set up to ensure the smooth communication from start to finish. 


    Unique Document Check

    TBD

    Thursday, December 13, 2018

    Field Validation

    Rethink Workflow provides an effective way to ensure inputs captured properly using Field Validation.

    Required Validation

     Required Validation allow the workflow designer to indicate the fields that need the end-user to fill in the value before taking any action.

    How to Design

    To indicate a field is required, the workflow designer can click on the Edit button to open the Property panel, switch to "VALIDATION" sub-tab, and select "Yes" for "Required?" option. 

    Usage

    The required validation happens as the end-user is typing. The end-user has to enter the value for the required fields in order to take an action (transition). If there is any error, the system won't allow to proceed. 


    Using Custom Error Message for Required Validation

    Instead of using the default error message, (e.g. "the value of this field is required"), the workflow designer can also specify a custom error message to make the form more user-friendly.

    How to Design

    To set the custom error message, use "Required Validation Error" option. This option allows to use placeholders to make it dynamic based on the value enter. 

    Usage

    When the required value is not provided, the system will print out the error set in the Design screen. 

    Advanced Validation

    Rethink Workflow provides a powerful way to perform complex field validation using Validation Function and Invalid Error option. 
    Validating Function option contains an expression (in basic mode) or a javascript function (in advanced mode). This expression is evaluated at run-time to determine the returned boolean value. If the returned boolean value is true, the field is considered to be valid.
    Invalid Error option allow to customize the invalid error message if the field does not pass the Validating Function above.

    You can refer to Visibility Condition for entering values in basic mode and advanced mode.

    Action-based Field Validation

    By default, all fields in a form are validated. But in some scenarios, you might want to exclude some fields to allow the end-user to take an action. For example, you might want the approval to provide comment if he/she declined a request for leave from an employee. However, the comment is not required when he/she approves the request.


    Request for Leave

    Request for Leave workflow allows employee to submit leave requests for supervisor's approval. The employ needs to sign the request and selects the approver from the list provided for approval.

    Form


    Workflow


    Roles

    1. Document Owner: the employee requests for leave
    2. Supervisor: the supervisor who needs to approve the request

      Tuesday, December 11, 2018

      Workflow Reminders

      Want to send an email automatically if the manager has not yet taken any decision on a request after a specific number of days (and include the reason for leave, maybe)? Workflow Reminders allow the to set up a schedule for reminding one or more people via email notifications.

      How to design

      To manage the list of reminders, click REMINDERS tab on the workflow design screen


      The system categorizes reminders based on States. To create a new reminder, click on the button "NEW" on the right-hand side and fill in the details. You can also use use placeholders in subject, body, and condition of the reminder.
      For example, in Contact Us workflow, let's say that we want to send out reminders to customer service specialist to respond to the customer's inquiry after 1 day, we could follow the steps in the video below:

      To edit a reminder entry, click on the "EDIT" button on the right.

      To delete a reminder entry, click on the right caret on the right of EDIT button then click on Delete, or use DELETE button.

      Using condition

      You can use condition to decide whether to run a reminder or not based on values on the form. When the condition is evaluated as true, the system will proceed to run the reminder. You can learn more about the syntax of condition in visibility condition guide.

      Sunday, December 9, 2018

      Document Commenting

      Comment is particularly useful to foster the conversation between people involved in a workflow. Our system allows end-user to make comment on an entire document or on particular field without any hassle.

      Whenever a comment is added, Rethink Workflow will send out an email as in below:


      Rethink Workflow allows administrator to decide if a particular user can make comment or not via permissions while designing the workflow.

      How to design

      To allow end-user to add comments on a document, the workflow designer can select "COMMENT" option on each field when setting up the field permissions.

      If an end-user can add comments on any field according to permissions, that user can add comments for the entire document too. 

      How to add comments on a document

      Add comments for the entire document

      Follow the steps demonstrated in the following video to add comments for the entire document:

      Add comments for a particular field

      On a particular field, click on the corresponding "COMMENTS" button to see the comment panel. On this panel, write the comments and click on Send button as usual. 

      Saturday, December 8, 2018

      Workflow Triggers

      Triggers allow the workflow designer to send out email notifications or putting a new entry in the audit trail when a document transitioning from one state to another.
      There are two types of triggers:
      • Audit Trail: allow the workflow designer to put an entry to the document routing history
      • Email Notifications: allow the workflow designer to send out email notification to one or more recipients

      How to design

      To make changes on triggers, on the workflow design screen, click on TRIGGERS tab


      Audit Trail

      To go to the screen for managing Audit Trail, click on "AUDIT TRAIL" sub-tab under TRIGGERS

      To edit an audit trail entry, click on the "EDIT" button on the right. While editing the audit trail, you can also use placeholders in "Title" or "Description".

      To view the audit trail at runtime, expand the menu on the left of BACK button and select History:

      The audit trail of the current should be displayed similar to the following figure: 

      Email Notifications

      Similar to Audit Trail, you can send email notifications to one or more people using Email Notifications triggers. To manage list of email notifications triggers, click on the tab "EMAIL NOTIFICATIONS". 

      To add a new email trigger, click on button NEW on the corresponding action panel, then enter the required values. Of course, you can also use placeholders in the subject, body, and condition.

      The following figure shows the actual email sent out to the "Customer Service Specialist" when someone submits an inquiry on "Contact Us" form:

      Using condition

      You can use condition to decide whether to run a trigger or not based on values on the form. When the condition is evaluated as true, the system will proceed to run the trigger. You can learn more about the syntax of condition in visibility condition guide.

      Workflow Revisions

      Have you ever had the need of adding / removing fields on the form; changing the routing process of a workflow; or changing the workflow permission? Our system has a solution for this.
      Rethink Workflow allows to create multiple revisions (aka. "variants") so that you can customize your form and process over time.

      Creating new variant

      After publishing your workflow, if you want to create a new variant of your workflow, click on NEW button as in the following figure

      "New Variant" has been created and you can start making changes to the new variant.

      Changing variant name & description

      To change the variant name & description, switch to "VARIANT" tab and enter the required information there. 

      Setting a variant as active

      Each workflow can only have one active variant at a time. The active variant is the one that new document can be initiated and is denoted with the orange star. 

      To set a variant to be the active one, select the variant and click on "SET AS ACTIVE" button. 

      Cloning a variant

      Instead of creating a new variant and starting from scratch, you can also clone an existing variant and start making changes. 

      Deleting a variant

      If a variant is not a default variant, you can delete it by clicking on "DELETE" button as in the below figure: 
      If a variant has associating documents, you must delete the documents first using "DELETE ALL DOCUMENTS" button before deleting the variant.


      Thursday, December 6, 2018

      Streamlined Authentication Process

      Starting from v6.0, we have improved our internal authentication process to make it easier for user to create and manage their account with Rethink Workflow.

      This guide is only applicable to users who belong to organizations that does not use single sign-on method.

      Creating a new account

      1. Access to https://secure.rethinkworkflow.com, fill in the email address, complete the CAPTCHA challenge, and click NEXT.
      2. Enter the full name, agree to our Terms of Service and Privacy Policy, and optionally subscribe for updates, then click NEXT
      3. Check your mailbox for the email similar to this:
      You can either click on the link attached or use the generated password to sign in to Rethink Workflow.

      Sign in to Rethink Workflow

      1. Go to https://secure.rethinkworkflow.com
      2. Enter your email and password
      3. Complete the CAPTCHA challenge
      4. Click NEXT. 

      Forgot password

      If you forgot the password, you can get a temporary password using the following steps
      1. Go to https://secure.rethinkworkflow.com, enter your email address and complete the CAPTCHA challenge, and click NEXT
      2. Click on "Forgot your password? Click here"
      3. Complete the CAPTCHA challenge one more time, and click on "REQUEST ONE-TIME LOG IN LINK"

      4. Check your mailbox for email similar to the following figure, click on the link to sign in.

      Change Password

      Once logged-in, you can change your password by following steps in the following video


      Contact Us Template

      Contact Us workflow template is the minimal template to create an online contact form quickly and easily. Contact Us is a public workflow, which means anyone outside of your organization can send an inquiry about your products or services.

      Form

      Flow

      Roles

      You can add users within your organization to "Customer Service Specialist" so that the system sends them communication when someone submits an inquiry.

      Triggers

      There are many triggers set up to ensure a streamlined communication between the customer service specialist and the request creator (e.g. Document Owner).


      Wednesday, December 5, 2018

      Graphical Process Designer

      Rethink Workflow aims to solve the complex business process modeling problem with the simplest solution possible. Unlike other workflow software in the market, we want to present the whole business process, including states and transitions, to the end-users at a glance by utilizing State Diagram.

      The entire process of Branding Design Request can be presented in the following figure:


      In this figure,

      • An ellipse represents a state  of the document being routed at a particular time. For example, "Submitted" indicates that the customer has already submitted the request for branding design. 
      • An arrow represents a transition (aka "action") from one state to another. For example, "Start working" is a transition that moves the request from "Submitted" to "Design Pending". A transition is displayed to the end-user as a button.
      • The solid dot at the top-left corner indicates the start of the document. There can only be one transition fans out from this initial state and usually named as "Create", which moves the document to the initial state, e.g. Draft.
      • The 2-circle dot at the bottom-right corner represents the final state of the document. A document reaches one of the exit states, e.g. Done, the workflow is considered to be completed. 

      How to design

      While designing the workflow, use FLOW tab to design the process.

      To add a new state, click on NEW STATE button as in the following video: 

      To edit an existing state, simply double click on the corresponding ellipse. 


      To add a new transition, click on "NEW TRANSITION" button


      To edit an existing transition, double click on the transition and change the properties in the panel below. 


      While entering the name of the transition, you can also use placeholders to make it more user-friendly. For example, you can name a transition as "Return to {{owner.name}}" and the button representing the transition will show "Return to Jackson Miller" during run-time. 

      States and Transitions during run-time

      During run-time, e.g. the time the end-user is interacting with your workflow, the current state of the document usually displayed as a rounded rectangle as in the below figure: 


      The transitions are displayed as buttons at the bottom section: 


      Saturday, December 1, 2018

      Rating Control


      Introduction

      Rating Control allows a user to express feedback in a more intuitive and user friendly manner.

      Features

      • Allows user to specify rating
      • Specify any number of stars while designing
      • Allow rating increments in both full and half stars

      How to design

      To add the Rating control to your form, simply drag and drop it from the control panel to the form-design area.


      To adjust the properties, click on OPTIONS tab on the properties panel below the control.
      You can
      • Specify the number of stars in the rating field
      • Allow half increment


      How to use

      The animation below demonstrates how the end-user interacts with a Ratings control. In the example below, we have allowed half increment for rating


      Using the Rating field in reporting

      Include the Rating field in column

      To include a Rating field in the list of columns of the report, click COLUMNS button and select the corresponding Rating field from the popup:


      To export the Rating values, click on EXPORT button and select the desired formats. The checkboxes field provides the following attributes:
      • value: The numeric value for the rating given

      Filter documents using the Rating field

      To filter documents using the rating field, click on FILTERS and select the field from the list of filters. Once the field is added, we can then click on this field using which we can specify a condition for filtering documents. In the example below we want to filter all feedback documents that have a rating of greater than 3


      Friday, November 30, 2018

      How do I search for documents using their values?

      This post is the answer to the following question:
      From the dashboard, click on "VIEW ALL" below "Recent Documents" to go to reporting screen:

      On the reporting screen, enter the text to "Contains text" to search for documents:

      Need help? Give a comment here to contact our support.